
It’s exciting to build a new house, especially if you know what to expect.
The construction of a new house starts much before the foundation is laid. If you take the time to make a detailed design and hire a reliable contractor, building can be an exciting and rewarding experience. Ask questions and share your experiences with those who have gone through the process of turning a dream home into a reality.
This article covers the typical procedures your builder takes and what happens at these crucial stages of development to help you prepare for and understand your new home’s construction. Check out botanic homes liquidation.
How Do You Start Building A House?
Starting to build a house involves several important steps. Here’s a general outline of the process:
1. Determine Your Requirements
When determining your requirements for a house, it’s essential to consider your needs, preferences, and lifestyle. Here are some factors to consider:
Size and layout:
Determine the desired square footage of your house based on the number of people who will live in it and your lifestyle. Consider the number of bedrooms, bathrooms, living spaces, and any additional rooms you may require, such as a home office, guest room, or hobby room. Think about the flow and functionality of the space and how it aligns with your daily activities.
Architectural style:
Explore different architectural styles to find the one that appeals to you. Styles can range from traditional (such as Colonial, Victorian, or Craftsman) to modern (such as Contemporary or Mid-Century Modern) or even a fusion of styles. Choose a style that reflects your taste and complements the surrounding environment.
Specific features and amenities:
Consider any specific features or amenities that are important to you. This could include an open floor plan, a gourmet kitchen, a fireplace, a dedicated laundry room, ample storage space, a home theatre, a swimming pool, a garden, or outdoor entertaining areas. Make a list of must-haves and nice-to-haves to help prioritize your requirements.
Energy efficiency and sustainability:
If environmental considerations are important to you, think about incorporating energy-efficient features into your house, such as proper insulation, energy-efficient windows, solar panels, or a rainwater harvesting system. Look into sustainable materials and construction practices to minimize the environmental impact of your home.
Accessibility:
Consider any specific accessibility requirements you or your family members may have. This includes features like wheelchair ramps, wider doorways, grab bars, and accessible bathroom fixtures. Designing your house to be accessible can ensure comfort and ease of use for everyone.
Outdoor space:
Evaluate your preferences for outdoor areas. Do you want a large backyard for recreational activities, a small low-maintenance garden, or a spacious patio for entertaining? Consider how your outdoor space can be integrated into your overall vision for the house.
Future needs:
Think about your long-term plans and how they might impact your house. Are you planning to expand your family? Do you anticipate aging in place? Consider incorporating flexibility into your design to accommodate future changes and avoid the need for major renovations down the line.
Budget:
While considering your requirements, it’s important to align them with your budget. Determine what you can afford and prioritize your needs accordingly. Be aware that certain features or architectural styles may incur additional costs.
Remember, these considerations are subjective and should be tailored to your personal preferences and circumstances. Consulting with an architect or designer can be immensely helpful in translating your requirements into a cohesive design that meets your needs and aspirations.
2. Set A Budget
Setting a budget is a crucial step in building a house. Remember that building a house often involves additional costs beyond the initial construction, such as property taxes, insurance, and ongoing maintenance. Having a clear understanding of your financial limitations and carefully planning your budget will help you embark on your house construction project with confidence.
3. Obtain Land
If you don’t already own a suitable piece of land, you’ll need to acquire one. Consider factors like location, accessibility, utilities, zoning regulations, and the overall suitability for building a house. By considering these factors, you can make an informed decision when acquiring land for your house construction.
Conduct thorough due diligence, seek professional advice, and ensure the land meets your specific needs and requirements before proceeding with the purchase.
4. Design The House:
Designing the house is an important step in the construction process, and working with an architect or designer can help bring your vision to life. They will consider your requirements, incorporate architectural and structural considerations, and ensure compliance with local building codes.
Throughout the design phase, maintain open communication with the architect or designer. Collaboration, feedback, and clear communication are key to achieving a design that meets your expectations. With their expertise and your input, you can create a well-designed house that reflects your style, functionality, and requirements.
5. Secure Necessary Permits
Securing the necessary permits and approvals is a critical step before starting the construction of your house. Contact your local municipality or relevant authorities to obtain the required permits and approvals for construction. This typically includes submitting your house plans and paying the applicable fees.
It’s important to note that permit processes and requirements can vary depending on your location. Working closely with your architect, designer, or a construction professional who is familiar with local regulations will ensure a smoother permit application and approval process. Compliance with the permit requirements is crucial to ensure the safety, legality, and successful completion of your house construction project.
6. Hire Professionals:
Hiring professionals for your house construction project is essential to ensure a smooth and successful building process. Engage a team of professionals, including a general contractor, subcontractors (such as electricians and plumbers), and an architect if you haven’t already done so. Research and interview potential candidates, check their references and select reputable individuals or firms with relevant experience.
Remember that hiring professionals is a significant decision, and taking the time to conduct thorough research, interviews, and reference checks is crucial. By selecting reputable and experienced professionals, you can rely on their expertise to bring your vision to life and ensure a successful construction process.
7. Prepare The Site
Preparing the construction site is a crucial step before starting the actual construction of your house.
Clear the land and prepare the site for construction. This involves grading the land, making sure utilities are accessible, and setting up temporary infrastructure like site fencing and storage.
Proper site preparation sets the foundation for a smooth construction process. It ensures that the construction site is safe, accessible, and ready for the next stages of building your house. Engaging professionals with experience in site preparation can help ensure that the process is executed efficiently and following local requirements.
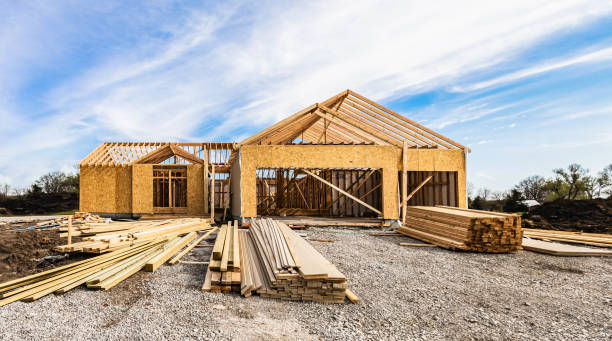
8. Foundation And Framing
The foundation and framing stages are crucial in building the structural framework of your house. Begin with constructing the foundation, which provides a stable base for the house. Once the foundation is completed, move on to framing, where the basic structure of the house, including walls, floors, and roof, is built.
Foundation Construction:
a. Excavation: Excavate the area where the foundation will be built, following the approved site plans and foundation design. Clear the soil and ensure proper grading.
b. Footings: Dig and pour footings, which are concrete structures that support the weight of the foundation walls and distribute it to the ground.
c. Formwork: Install formwork or moulds to shape the foundation walls and footings. This can be done using wood, steel, or insulated concrete forms (ICFs), depending on the chosen construction method.
d. Reinforcement: Place reinforcement, such as steel rebar, within the formwork to strengthen the concrete foundation.
e. Concrete pouring: Pour concrete into the formwork to create the foundation walls and footings. Ensure proper curing and allow sufficient time for the concrete to gain strength.
f. Waterproofing and drainage: Apply waterproofing materials and install drainage systems, such as perimeter drains and sump pumps, to protect the foundation from water intrusion.
Framing:
a. Wall framing: Once the foundation is cured, start framing the exterior and interior walls. This involves assembling the wooden or steel frames, including the vertical studs, horizontal plates, headers, and sills, according to the architectural plans and structural requirements.
b. Floor framing: Install the floor system, which includes floor joists, subflooring, and bridging. This creates a sturdy platform for the upper levels of the house.
c. Roof framing: Construct the roof structure, which consists of rafters or trusses, ridge boards, collar ties, and roof sheathing. This establishes the shape, slope, and support for the roof.
d. Window and door openings: Frame openings for windows and doors as specified in the design plans. Install appropriate headers, sills, and rough openings to accommodate the windows and doors.
e. Bracing and structural connections: Ensure proper bracing and structural connections to enhance the strength and stability of the framing. This includes securing wall-to-floor connections, adding diagonal bracing, and reinforcing critical areas.
Throughout the foundation and framing stages, it’s essential to adhere to local building codes and regulations. Engaging experienced contractors or construction professionals specializing in foundation work and framing can help ensure that these critical stages are executed accurately and in compliance with the structural requirements. Inspections by local building authorities may be required at specific milestones to verify compliance before proceeding to the next stages of construction.
9. Rough-Ins:
The rough-in stage is a critical phase of construction where the essential systems of plumbing, electrical, and HVAC are installed.
After framing, the rough-in stage involves installing essential systems such as plumbing, electrical, and HVAC (heating, ventilation, and air conditioning). This work is typically completed by specialized subcontractors.
Plumbing Rough-In:
a. Water supply lines: Install the water supply lines that will deliver water to various fixtures in the house, including sinks, showers, toilets, and appliances. This involves running pipes through walls, floors, and ceilings, connecting them to the main water supply and routing them to the appropriate locations.
b. Drainage and vent pipes: Install the drainage and vent pipes that will carry wastewater away from the fixtures and ensure proper ventilation within the plumbing system. These pipes connect to the main sewer or septic system.
c. Plumbing fixtures: Rough-in connections for plumbing fixtures by installing stub-outs or rough plumbing connections. These connections will be later connected to the actual fixtures during the finishing stages.
Electrical Rough-In:
a. Electrical wiring: Install electrical wiring throughout the house according to the electrical plans. This includes running electrical cables through walls, floors, and ceilings, and connecting them to electrical panels, outlets, switches, and other electrical components.
b. Service panel: Install the electrical service panel, which houses the main circuit breaker and distributes electricity to different circuits within the house.
c. Lighting and switches: Position rough-in boxes for light fixtures and switches as indicated in the electrical plans. These boxes will be later connected to the actual light fixtures and switches during the finishing stages.
HVAC Rough-In:
a. Ductwork: Install the ductwork for heating, ventilation, and air conditioning systems. This involves running ducts through walls, floors, and ceilings, connecting them to the HVAC equipment, and ensuring proper airflow to different areas of the house.
b. Vents and grilles: Position rough-in boxes or openings for vents, registers, and grilles as per the HVAC design plans. These will be later connected to the HVAC equipment during the finishing stages.
c. Equipment installation: Install the main HVAC equipment, such as furnaces, air conditioning units, heat pumps, or boilers. Connect them to the ductwork and ensure proper functioning.
During the rough-in stage, specialized subcontractors, such as plumbers, electricians, and HVAC technicians, work closely with the general contractor to coordinate their installations. These professionals ensure that the necessary systems are properly roughed-in, leaving room for future connections and finishing touches.
It’s important to follow local building codes and regulations, including obtaining necessary permits and scheduling inspections during the rough-in stage to ensure compliance and safety. Once the rough-in work is completed and approved, the construction can progress to the next phase, which involves interior and exterior finishing.
10. Interior And Exterior Work
Proceed with interior and exterior finishes, including insulation, drywall installation, flooring, painting, roofing, siding, and other tasks. Cabinets, countertops, fixtures, and other elements are also installed during this phase.
Throughout this phase, attention to detail, craftsmanship, and coordination between various tradespeople are crucial to achieving the desired results. Regular communication with your general contractor and subcontractors is important to address any issues or changes that may arise during the finishing stage. Once the finishing work is complete, you’ll be one step closer to moving into your new home.
11. Finalize Utilities:
Connect the house to utility services such as electricity, water, gas, and sewage systems. Ensure that all installations meet safety codes and regulations. Throughout the process, it’s important to communicate and coordinate with utility companies, general contractors, and relevant professionals to ensure a smooth connection of utility services.
Adhering to safety codes and regulations is crucial to ensure the safe and reliable operation of the utilities in your house.
Once the utility connections are finalized, ensure that all systems are functioning properly and safely before moving into your new home.
12. Finishing Touches
During the final stage of construction, the finishing touches are added to complete your house and create a welcoming and functional living space. By focusing on these finishing touches, you can transform your house into a comfortable and visually appealing home.
Collaborate closely with your general contractor and subcontractors to ensure that all finishing work is completed according to your specifications and expectations. Once the finishing touches are in place, you can look forward to moving into and enjoying your new house.
13. Inspections And Approvals
Schedule inspections at various stages of construction to ensure compliance with building codes and regulations. Obtain the necessary approvals from the authorities. It’s important to note that inspection processes and requirements may vary depending on your location. Engaging with local building department officials and following their guidelines is crucial to ensure compliance with local regulations.
By scheduling inspections and obtaining necessary approvals, you demonstrate your commitment to safety and compliance, ensuring a successful and legally compliant construction project.
14. Final Walkthrough And Move-In
Before moving in, conduct a thorough walkthrough with the contractor to identify any remaining issues or defects that need to be addressed. Once you’re satisfied with the construction, it’s time to move into your new home.
Remember, the final walkthrough is your opportunity to thoroughly inspect the construction and address any remaining concerns before you take possession. By documenting any deficiencies and working closely with your contractor to address them, you can ensure that your new home meets your expectations and is ready for you to move in.
Conclusion
In conclusion, building a house involves several important steps and considerations. From determining your requirements and setting a budget to securing permits, designing the house, and engaging a team of professionals, each stage plays a vital role in the successful completion of your project.
Preparing the construction site, constructing the foundation and framing, and completing rough-ins for essential systems are key milestones that lay the groundwork for the construction process. The finishing touches, including interior and exterior work, inspections, and obtaining approvals, bring your vision to life and ensure compliance with building codes and regulations.
Finally, conducting a final walkthrough and preparing for the move-in allow you to assess the construction, address any remaining issues, and ultimately begin enjoying your new home.
Throughout the journey of building a house, effective communication, careful planning, and collaboration with professionals are essential. It is important to stay informed about local regulations, adhere to safety standards, and make informed decisions regarding materials, finishes, and utility connections.
By following these guidelines and working closely with your team, you can create a beautiful and functional home that meets your needs and provides a safe and comfortable living space for years to come.